Showing posts with label recipe. Show all posts

Wednesday, September 18, 2013

Mexican Stuffed Peppers

Hey everyone!

Thanks for stopping by! :) Things have been busy around here, little man may not be in school, but it seems like the school year hit us hard anyways. I have been super busy planning our next year of primary and trying to get organized before the holidays hit. Yes, I just mentioned the holidays! September is already half way gone! We have about six weeks until Halloween, and you know how time flies after that. Have you decided what the kids will dress up as? Or what you will for that matter? My little guy keeps changing his mind, anything from Hulk, to Ironman, to Superman, and now to The Little Mermaid. Shhh...don't tell his daddy. ;)

Anyways, I kind of made up a new recipe last night that I wanted to share. Now that it's getting cooler and my house doesn't feel like a sauna when I cook, I felt like making a hot, healthy meal. I've been wanting to try my hand at stuffed peppers again, so I just dove in.

Here is the final product:


What you'll need:

4 Green peppers (or red or yellow, or a variety)
1 yellow onion
2.5 cups brown rice cooked
1 can black beans, rinsed and drained
1 can corn, drained (I didn't have any, so I just left it out and it was still good)
1 lb. ground beef
1/2 cup enchilada sauce
Mrs. Dash Southwest Chipotle Seasoning
1.5 cups Medium Cheddar cheese
Olive oil

1. Preheat the oven to 350 degrees. Get a casserole dish and line the bottom with wax paper.

2. Slice the peppers so you can stuff them. I just sliced off the top, but you could cut them length wise as well. Rinse them out and coat them lightly with olive oil. I just used a spray. Place these on the prepared dish and pop them in the oven for maybe ten minutes or so.

3. Brown the ground beef with the chopped yellow onion. Rinse and place in a large bowl. Combine the black beans, corn, rice, and beef and onion mixture together. Stir well.

4. Add in the enchilada sauce slowly, tasting often. You may find you don't need as much or maybe you'd like more. Sprinkle Mrs. Dash Southwest Chipotle Seasoning throughout in the same way you added the enchilada sauce. You want to do this to taste, I probably used between 1-1.5 Tablespoons. But I'm also a wimp, and you may like it more spicy than this.

5. Add about 1/2-3/4 C of cheese. I added this last so it didn't get too melted.


6. Stuff the peppers and top with the remaining cheese. Place them back on the casserole dish and bake another 5-10 minutes or until the cheese is melted on top.

Voila! Now all you have to do is enjoy!

**Note, I made these and ended up with extra mixture. I threw the rest in a zip lock baggie and froze it. If you need more then 4 servings, you will probably be able to get more out of this if you just get more cheese to top it off with.**


I love stuffed peppers because they're so easy, taste good, and are good for you. They're also so versatile. Switch out ground turkey for ground beef, or even shredded chicken would be yummy. Paleo diet? Knock out the rice and corn add different varieties of beans and more onion. You can do so many things with it, and it can be changed to fit practically any diet.

Please don't forget to click the button below and follow me on blog lovin!

Follow on Bloglovin

Wednesday, May 29, 2013

Vanilla Cake with Strawberry Cream Cheese Filling

Three months ago I made my son his second birthday cake. As I was planning the party I found a vanilla cake with strawberry cream cheese frosting on pinterest. Let me tell you, it was love at first sight. It looked so good, I knew I had to try it. I wanted to do a trial run because, what if it wasn't? But, as luck would have it, I ran out of time. I had never made a vanilla cake from scratch, and to be honest, I was really concerned when I read the ingrediants. It called for things I didn't have in my kitchen and I don't like making substitutions the first time I try a recipe. I just wasn't sure it would turn out well. I debated on what to do since I knew I wasn't going to have time to redo it and decided on using this vanilla buttermilk cake recipe from Lick the Bowl Good. I really cannot say enough about this blog. I have tried several of her recipes and they all turn out really good. I have never met her or spoken to her, so my opinion is in no way tainted. She just has really good recipes. Because I've used her recipes before and had a lot of success, I felt more comfortable knowing what the finished product would be then someone I've never heard of before. I've had complete disasters before from random people and I didn't want to risk it with a birthday cake.

The one thing I was really worried about is the size of the cake. I wanted to make a 9x13 size sheet cake because I wanted to decorate the top of it, but because I wanted to do a filling, I needed enough for two layers. The Vanilla Cake recipe I used made plenty for me to do this, so I was really really happy. I didn't have to use all the strawberries it called for in the strawberry cream cheese frosting because I only did one layer. I used maybe 1/2 to 2/3 of the strawberries it called for. I spread the cream cheese frosting out and then laid sliced strawberries on top. I put the second layer on and frosted it in the remaining cream cheese frosting. It tasted really good, but I kept having to stick it into the freezer because it was kind of soft. It wasn't very good for decorating. Oh well, live and learn. I used a buttercream recipe to decorate the guys and write "Happy Birthday."

I made this again this past weekend for Memorial Day, which I don't like to repeat recipes because I have so many to try..haha! I used fresh locally grown strawberries we picked a few days previously and decorated the cake with blue frosting to make it red white and blue.

This cake recieved more compliments then anything I've ever made. I had people come back up for seconds, so you know that's a good sign. :)  Seriously, go make it! And splurge on the ingredients, get the buttermilk and get the cake flour, you won't regret it!

Stop on over to Lick the Bowl Good for the Vanilla Buttermilk Cake recipe.

Check out Perry's Plate for their recipe for the Strawberry Cream Cheese Frosting. Or you could always make the recipe they give with it. It has a lot of good reviews, I just wanted to stick with what I know. :)

Friday, February 15, 2013

Perfect Sugar Cookies

I'm not a huge fan of sugar cookies in general, but this recipe I'm about to unleash, is amazing. It bakes soft, moist cookies that pair perfectly with vanilla icing. These are so good that when I see another recipe on Pinterest, I'm not even tempted to look at it, let alone try it. I make these cookies every Christmas Eve for Santa (and he leaves us some pretty awesome presents, because of the cookies I'm sure ;)), and every Valentines Day. Growing up, my mom would bake each of her seven children and my dad a giant sugar cookie using this recipe. She would decorate them each individually with our names on it. It's kind of a big deal in my family. So naturally, when I got married I wanted to pass on this to my husband and children. My husband doesn't like Vanilla frosting, or food dye (he's kind of weird, he swears he can taste it), so I haven't been able to really get creative with these until recently. So here is what I did this year. Here is how you make them. 

Perfect Sugar Cookies
3 egg yolks 
1 cup shortening 
1 cup sour cream 
2 cups sugar 
1 tsp nutmeg 
1 tsp baking powder 
1 tsp baking soda 
a pinch salt 
4 cups flour 

Cream the egg yolks, sour cream, and shortening together. Add sugar to the creamed mixture. In a separate bowl wisk the remaining ingredients together. Slowly add to the creamed mixture.Place in the refrigerator to chill before rolling out. Bake at 350 degrees about 10 minutes but check frequently as my oven cooks things oddly. 

If you want to do the giant cookie like we do I recommend rolling the dough out on your cookie sheet and cutting it out on the cookie sheet. Because of this I also recommend using a cookie sheet without edges. If you don't have one I saw one at Walmart today for $4.96. Seriously, its worth it. Buy a few things generic to compensate if you have to but it will make your life so much easier. I just use a butter knife and lightly trace before actually cutting.

 {For the record, this is not the giant cookie. My husband wanted a smaller one because he's trying to eat less sweets. I figure since it was his request I would do it. My son and I's cookies are larger then our heads. They take up the whole cookie sheet :)}


Friday, October 12, 2012

Pizza Disaster

When I started this blog, I wanted it to be real. I wanted to give honest opinions about recipes and projects and give honest tips on how to do crafty and creative things easier without breaking the bank. Well, this is a good opportunity to be honest. I tried a recipe for a pizza dough after having lost my normal one I like a lot. Anyways, this seemed similar enough to the one I normally use, I figured it was close enough and would work. After following the directions exactly, I found the dough was really sticky. I couldn't use it like this, it was sticking to my hand every which way, so I kneaded some more flour in, maybe a cup or two. The recipe made enough for two pizzas so I froze one half of it. My mom has always made homemade pizza on a cookie sheet, so it was a big rectangle. That's what I always do also, makes me feel at home. :) So I greased the pan up, just like I have always done, and start stretching the dough. It was really difficult, more difficult then usual. But I stuck with it. When I got it to fit over the whole thing, I popped it in the oven at the temperature I was told to bake it at. I put it in there without any toppings first to get the dough to cook a bit more (this is what I normally do). Well, when it came out we could hardly get the edges off the sheet. It was terrible! I was so upset! I had already spread the pizza sauce and some of the cheese on before my husband got the ingenious idea to make sure it would even come off. So this is what we were left after that disaster.


I was so frustrated I left the kitchen and told my husband to fix it. And fix it he did. Okay maybe not the mess above, because that is just insanity, but he got the half of the dough I froze and put it on our pizza pan. He found online a tip of putting parchment paper underneath so it doesn't stick. Seriously. How ingenious is that? I couldn't believe I hadn't thought of it. So thank goodness for husbands. I was ready to let us have PB&J for dinner. The dough wasn't the greatest taste though. I won't be making it again, parchment paper or not.


Monday, October 8, 2012

Spinach Chips Recipe

Okay, I know, this doesn't sound good. Or at least it didn't to me at first. I hope it sounds good to you. But after reading a bunch of really good reviews, and buying way too much spinach for my quiches a few days ago, I decided to give it a go. I figured, worst case scenario I have to throw it all away, I probably would have done that anyways. I am the worst at using spinach. And to top it off, of course it comes in the buy one get one free deals. So you have to get two. 


Anyways, I found this recipe on Pinterest, and followed it closely. In it she suggests getting creative and using red pepper flakes, among other things. Well, Saturday I went to an Amish Market by us and bought a big tub of it for hardly anything. So I was waaay too excited to use it. My husband thought that and garlic powder sounded okay, so I did half of my cookie sheet just salt and pepper, 25% red pepper flakes, and 25% garlic powder. 

I was really excited to try the red pepper flakes, so as soon as they came out of the oven and cooled off a bit, I popped one of those babies in my mouth. Boy, did I have the wrong idea what that would taste like!! I thought it was like a green pepper, well, let me tell you, it was not. It was really hot. I am probably the only person in the world who didn't know that, so go ahead laugh at me, it's okay. But I won't be making that mistake twice. My hubs liked them though. So no harm no foul. I really liked the salt and pepper, to be honest I couldn't taste the garlic powder (perhaps I just burnt all my taste buds off), so I would suggest against that. But salt and pepper was really good. They were light, crunchy and I was sad when they were gone. I mean it. I never thought I'd say I wish I had more spinach anything. So there you go, if you have any left over spinach you need to use up, bake it in the oven, and make some chips out of it. I'm going to make some tomorrow night and try it with salsa. We didn't even get that far yesterday.

Now for how to do this. You can follow the link I listed above, which is essentially what I did, but I will include pictures below too.

I cleaned and dried the spinach. I drizzled about 1/2 tablespoon over it and mixed it with my hands. It spread really easily. Honestly, use less then you think you need. You can always add more. 


I think laid them out over a cookie sheet covered in parchment paper. The parchment paper worked well for me. Wax paper would probably work too. I then sprinkled the seasonings on top. You can do this to your hearts content.


Bake at 250 degrees for about 20 minutes or so. The blog I posted earlier said to check on them frequently after 15 minutes, and that hers took about 30. My oven is kind of quick, so I think that she gave good advice. 


Wednesday, September 26, 2012

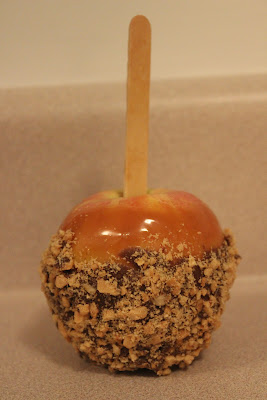
7 Step Carmel Apple Recipe

Why hello, Fall! Last weekend I went with my sister in law Apple picking for her daughters first birthday. We got some Fuji Apples and I pretty soon after getting them I knew I wanted to do Caramel Apples. I've never tried these before, but I figured, how hard can it be? Well, it isn't bad. I had heard that people had issues getting the caramel to stick but soon after researching them I found out you have to wash the apples good to get the wax off to get the caramel to stick. My first batch didn't have this issue because I got them straight from the orchard. My second batch I washed really good so I didn't really have a hard time with that either. 

Okay lets get started!


What you need:

6 Medium Apples (Any variety, honestly I don't think you can go wrong. So far I've used Gala and Fuji. Both turned out good. I've read to use more tart flavors though. It's up to you. Also, please note my number and sizing of the apples may be off. This is purely from my experience and just a guess on what you'll be able to get out of a bag.)

1 Bag Caramel (I have used Brach's and Kraft, both tasted great and worked well. In the Brach's I had to unwrap them, the Kraft were already unwrapped and it was about the same price.)

Chocolate Coating (I used Plymouth Pantry from WalMart. This is pretty cheap and it tasted great with it. If you want to splurge for higher end chocolate, great, but if you don't, I don't think it's necessary. Again with this, break off maybe 3 or 4 squares which is approx. 8 oz. You may need more, but you can always melt it if needed.)


Popsicle sticks or wooden dowels

Lined cookie sheet or baking pan. I lined mine with aluminum foil, but I kept thinking wax paper may work better. I didn't have any though, so if you do it try it with wax paper, let me know how it goes!

Peanuts or other garnish. I have seen people use M&Ms or Oreos, lots of different things. I bought Dry Roasted Peanuts.


Steps:

1. Wash the apples well. Dry them off completely. 

2. Insert the popsicle sticks or wooden dowels into the middle of the apples. Make sure you remove the stem first. 


3. Melt the caramel. I used a double broiler method and added about 1.5 to 2 TBS of water in. I put it on med-high, this will take a little bit. Just stir occasionally and be patient!

{It doesn't look so great. But this is how it's supposed to look, scared me for a few minutes though!}

 {Still looking good}

{Almost there}
 {And ready! You can see here I tilted the bowl a little bit}

4. Next is dipping the apples. I tilted the bowl to be a little crooked, this helped to get the apple covered in caramel. Remember you can be creative. You can go half way up the apple, go on an angle, or go high up like I did. You can't go wrong! After you are happy with the amount of caramel, place it on the lined cookie sheet.

 {Caramel is on them! You could stop here if you want, but you won't regret continuing ;)}

 5. Begin melting the chocolate. This can be done while they are setting and the caramel is cooling. Once they are cooled dip them like you did the caramel. Again, remember you can be creative! Do all 6 or so apples before adding on the toppings. The chocolate will not harden that quickly. I know this is nerve racking, and I did it one at a time the first time, but it got messy and it was a lot easier to wait a minute to add the peanuts. 


 {Chocolate is melting}

6. To add the peanuts or other toppings just roll the apple on a plate of toppings. I used my hands to make sure it got where I needed it to be. 

7. When you are finished, set it the fridge for about 15 minutes and slice up to eat! I have found trying to bite into these is next to impossible. So just slice parts off and enjoy!


 {Finished!!}

These apples are so good. My husband told me I was the best homemaker tonight, boy I fooled him! And they're so easy! You can slice these up and give them away for treats, or just stick them in a goodie bag for a neighbor. Or you can eat them all yourself, I won't judge you. Let me know what you ended up doing with yours! Get creative!

Wednesday, September 5, 2012

Philly Cheesesteak Stuffed Peppers Review/Tweeking

Who doesn't love Cheesesteaks? I grew up close to Philly, so when I saw this recipe, I knew I had to try it. I followed mostly everything she did, just with my own tweeks. I used three green bell peppers, halved. I used one large sweet onion and a small container of fresh baby bella mushrooms. I used 8 slices of provolone cheese, and I ran out so I used a little bit of cheese I had on hand, which was a mexican blend, and it tasted fine. You'd never have known it.


One of the things I did differently then her was to make it with Steak-Umm's instead of roast beef. Being someone who grew up so close to the "real deal," I couldn't do roast beef. I'm sure thats healthier then what I did, and I'm sure it tastes great, but I chose to mix it up a bit. If I had more time I would have done something more authentic then Steak-Umm's, but I was short on time and they are quick.


Another thing I did, which I don't know if she mentioned or not, was I baked the green peppers in the oven empty for about 10 or 15 minutes before hand so the pepper would be cooked a bit before I added everything in. I thought it added a nice touch. 


Overall, I thought they were really good. My hubby has already requested them again. :) This is a good option for someone who wants to cut out the bread. And there you go! Enjoy!


Until next time,

BBNO


Thursday, August 16, 2012

Chocolate and Peanut Butter? Yes, Please!

For the past few weeks I've really been getting the itch to bake. Badly. I am not what I would consider a master baker by any means, but I do like to have fun in the kitchen. The only thing is, it's been so HOT! I can't really justify heating my whole house up to my husband, just because I have "the urge." Well, my father-in-law's 50th birthday was coming up and I figured it was the perfect opprotunity to give myself the excuse. I asked my mother-in-law if she'd thought of anything for the birthday cake and she hadn't. She jumped at the chance to not have to make it, as she has been doing Nutrisystem and it's pretty tempting to bake a big cake. So after I got the permission, I got to planning.


I know my FIL loves Reeses, really anything chocolate and peanut butter, so I knew that's what I wanted to incorporate. I found lots of different ideas on Pinterest but a lot of the recipes called for something funky, or I wasn't sure on something. I have used a recipe a few times from another blogger, Lick The Bowl Good (Take time and check out her stuff, she's really great in the kitchen!). I decided that it was the one I wanted to go with, afterall, I knew it was good. But I wanted to find a really good peanut butter buttercream. I actually did a trial run a few days before the party (which I HIGHLY reccommend, for the following reason) and the buttercream  recipe I found and read raving reviews about, was not very good. The peanut butter taste wasn't as strong as I felt it should be. I didn't want it over powering, you don't want to feel as though you were eating straight peanut butter, but I wanted it noticable. Also, the texture was off. It was really difficult to frost the cake, so I had to nix that recipe. Then I went back to Lick The Bowl Good and found one she'd posted. I should've looked there in the first place. It was perfect! 


I orignally wanted to crush up frozen Reeses (frozen, so they'd resemble a Reeses inside when all was said and done. I read this tip somewhere and highly recommend it.) in the batter. I did this in the test cake and it didn't work out the way I wanted. So I froze the rest of my Reeses, choped them up, and threw a bunch in part of the buttercream. I didn't measure it out. I just did a few at a time until it gave me the consistancy that I wanted. I have to say, this buttercream was so light and easy to frost with, I was really impressed. After my trial run cake, I thought it was going to be difficult but it really wasn't. You can see in the pictures how smooth it is.

I made a 3 layer round cake. In between each layer I used the peanut butter buttercream with the crushed up Reeses mixed in. On the top I used plan peanut butter buttercream. On the sides I used a store bought (sshhh...!) chocolate frosting. I wanted to make a chocolate buttercream, but I haven't found a good enough one yet. I didn't want to do it all in the peanut butter, because I didn't want it to be too overwhelming. I did whip the chocolate frosting with my mixer for a few minutes to make it a little lighter. I cut Reeses in half and edged the bottom of the cake with them.

For the "50" on top, I just used a butter knife to outline the numbers, once I got it how I wanted it, I lined it in chocolate frosting and filled it in with crushed up Reeses.


Let me tell you, it was good. Seriously, if  you have a chocolate/peanut butter lover in your life, they will love you forever. My husband, who does not like cake (I know, what a weirdo!), loved this cake. He's actually asked me to make it for him since then. He was eating the peanut butter buttercream straight from the bowl. Seriously, make this cake! You won't regret it!

Chocolate Cake Recipe


Peanut Butter Buttercream

Let me know what you guys think!!

Until next time,

BBNO