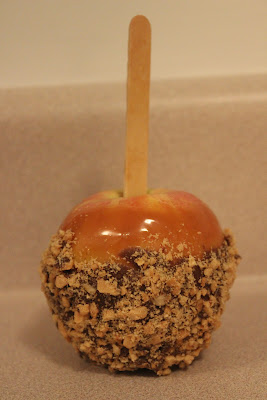
Why hello, Fall! Last weekend I went with my sister in law Apple picking for her daughters first birthday. We got some Fuji Apples and I pretty soon after getting them I knew I wanted to do Caramel Apples. I've never tried these before, but I figured, how hard can it be? Well, it isn't bad. I had heard that people had issues getting the caramel to stick but soon after researching them I found out you have to wash the apples good to get the wax off to get the caramel to stick. My first batch didn't have this issue because I got them straight from the orchard. My second batch I washed really good so I didn't really have a hard time with that either.
Okay lets get started!
What you need:
6 Medium Apples (Any variety, honestly I don't think you can go wrong. So far I've used Gala and Fuji. Both turned out good. I've read to use more tart flavors though. It's up to you. Also, please note my number and sizing of the apples may be off. This is purely from my experience and just a guess on what you'll be able to get out of a bag.)
1 Bag Caramel (I have used Brach's and Kraft, both tasted great and worked well. In the Brach's I had to unwrap them, the Kraft were already unwrapped and it was about the same price.)
Chocolate Coating (I used Plymouth Pantry from WalMart. This is pretty cheap and it tasted great with it. If you want to splurge for higher end chocolate, great, but if you don't, I don't think it's necessary. Again with this, break off maybe 3 or 4 squares which is approx. 8 oz. You may need more, but you can always melt it if needed.)
Popsicle sticks or wooden dowels
Lined cookie sheet or baking pan. I lined mine with aluminum foil, but I kept thinking wax paper may work better. I didn't have any though, so if you do it try it with wax paper, let me know how it goes!
Peanuts or other garnish. I have seen people use M&Ms or Oreos, lots of different things. I bought Dry Roasted Peanuts.
Steps:
1. Wash the apples well. Dry them off completely.
2. Insert the popsicle sticks or wooden dowels into the middle of the apples. Make sure you remove the stem first.
3. Melt the caramel. I used a double broiler method and added about 1.5 to 2 TBS of water in. I put it on med-high, this will take a little bit. Just stir occasionally and be patient!
{It doesn't look so great. But this is how it's supposed to look, scared me for a few minutes though!}
{Still looking good}
{Almost there}
{And ready! You can see here I tilted the bowl a little bit}
4. Next is dipping the apples. I tilted the bowl to be a little crooked, this helped to get the apple covered in caramel. Remember you can be creative. You can go half way up the apple, go on an angle, or go high up like I did. You can't go wrong! After you are happy with the amount of caramel, place it on the lined cookie sheet.
{Caramel is on them! You could stop here if you want, but you won't regret continuing ;)}
5. Begin melting the chocolate. This can be done while they are setting and the caramel is cooling. Once they are cooled dip them like you did the caramel. Again, remember you can be creative! Do all 6 or so apples before adding on the toppings. The chocolate will not harden that quickly. I know this is nerve racking, and I did it one at a time the first time, but it got messy and it was a lot easier to wait a minute to add the peanuts.
{Chocolate is melting}
6. To add the peanuts or other toppings just roll the apple on a plate of toppings. I used my hands to make sure it got where I needed it to be.
7. When you are finished, set it the fridge for about 15 minutes and slice up to eat! I have found trying to bite into these is next to impossible. So just slice parts off and enjoy!
{Finished!!}
These apples are so good. My husband told me I was the best homemaker tonight, boy I fooled him! And they're so easy! You can slice these up and give them away for treats, or just stick them in a goodie bag for a neighbor. Or you can eat them all yourself, I won't judge you. Let me know what you ended up doing with yours! Get creative!


